In Appendix C, on page 429 of the book, there is a crude sketch and accompanying description.
"Round pointed shovels, light and strong, light steel picks and strong tin pans holding about 2 gallons are in most demand. The tin wants to be of the heaviest kind. When made on purpose a strip of tin about an inch wide and made convex outward is soldered under the rim or wire on the outside making a smooth round projection to take hold of. Imagine this fragment of a pan in diagram ( Lord's reference to his sketch, seen below ) to be bottom side upward you can see the roll of tin on the outside. Such pans bring 6 dollars here, plain ones 5, old worn, bruised light ones 3 1/2 to 4."
 |
| Lord's sketch |
When I first read this back in 1999, I wasn't quite sure what Lord was describing having never seen an actual example of this style of pan. I didn't think much more about it until my friends Nick Kane and Jon McCabe discovered physical evidence of these pans while metal detecting for Gold Rush relics.
 |
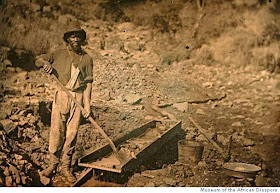
| African American Gold Miner with His Long Tom Gold Pan to the Right Image Courtesy Museum of African Diaspora |
One of the primary resources for Gold Rush material culture study is the incredible photographic record that has survived. As these pans gained our interest, we wondered if there were any images of them in use ? You know the old saying, once you know what you are looking at, things start popping up. Right there in one of the most published Gold Rush daguerreotypes, was the pan of interest.
 |
| Detail of Pan from Above Image Note the Roll under the Edge |
Some time later, another amazing image surfaced as the perfect document of this "improved" wash bowl / gold pan.
 |
| A Truly Remarkable Portrait of a Gold Miner There's That Gold Pan ! Image Courtesy Treasurenet |
My friend Nick sent me this illustration by contemporary artist Charles Christian Nahl, which appears to depict the pan. Nahl is well known for his accurate portrayals of Gold Rush life and was one of the most prolific artists of the period.
 |
| Nahl illustration courtesy of Nick Kane |
What more could I want ? It took awhile but I finally decided that the time had come for me to make a replica of this pan. My friend Jon McCabe gets the credit for recreating the first one though.
 |
| Original Pan with Remnants of the Shaped Ring Images Courtesy Jon McCabe |
Jon copied his original 5 section, pieced pan shown above. It was recovered from a mining camp site on one of his metal detecting adventures.
Here's another view that show the remaining sections of the original pan.
And another closer view.
 |
| Jon's Reconstructed Pan Inside View |
He was also fortunate to have a neighbor create a die which helped him form the curved sections needed.
 |
| Outside Bottom View Showing the Ring |
Jon's example gets the prize for most authentic and as such now resides in the El Dorado County Historical Museum. Great job McCabe !!
 |
| View of the Ring from the Side |
Eons ago, I made a historic style, pieced pan using an original 4 section wash bowl that I own for the pattern. It is 15" in diameter and about 3 1/4" deep and made from unplated sheet steel. It holds 2 gallons exactly as Lord described. I've even used it for recreational panning over the years and discovered that my hands would tire from holding the narrow rim. When you consider that a good panner needed to wash about 40 - 50 pans a day, any improvement in comfort would have been welcome.
I decided to use this existing pan and alter it to recreate the "improvement".After some experimentation, I finally arrived at a pattern for the convex sections. The hardest part was the compound curves, as the pieces have to fit two different arches, while resting on the tapered side of the pan.
 |
| My Version of the Pan |
Without an original example to copy, my version would be an impression at best but still faithful to the historic pattern. I formed the pieces over a curved piece of 3/4" pipe using a rawhide mallet. It took some stretching to form the compound curves. Eventually the sections were soldered in place on the bottom edge only, as they tucked neatly under the rim. Jon McCabe informed me that on one of the relic pans he studied, the wire was absent from the rim entirely.
 |
| Another view |
When my pan was finally finished the best part was taking it into the field and using it. With the pan loaded with water and material, it is noticeably easier to "take hold of" as Lord described. I love it ! History you can get a grip on.


Nice blog! On another subject, I have a question about a blog you did in 2011 about the calico shirt you purchased from Bill Brown's estate. Do you recall if the shirt has a back yoke? Or are the front and back attached with a straight seam at the shoulder? I want to replicate the shirt, but there is no back drawing in Brown's book. Thank you! Eileen (docent at Sutter's Fort and Proprietor of Talbott & Co. Heritage Goods www.talbottandco.etsy.com)
ReplyDeleteGreetings Eileen,
ReplyDeleteThere isn't a seam on the top as front and back are one piece. There is however a lining piece or binder on the inside that goes from front to back equally over the shoulder. You can see it in Brown's drawing on page 84 shown at 8" down from the shoulder on the front. It's the same on the back. Good Luck on your project.