Hello and welcome to my blog. What I'm doing here is documenting my personal expression of "hands-on history" from a craftsman's perspective. I've been on this path for a large part of my life and it's taken me to some interesting and challenging places. I hope to share the processes and the historically inspired objects I've crafted along this journey into our past. This adventure has deepened my appreciation for past craftsmanship and the intelligence of common place things in Early America. Besides, now I have all this cool stuff to play (teach) with.


Jim Miller


Monday, September 2, 2013

Explorations into 19th Century Angling Continues With Fly Books and Boxes

     This post revisits and explores some of the ways 19th century anglers stored their flies and leaders (or casts, as the English call them) when stream side. One popular choice was a "fly book", which in the earliest versions, was a small, bound book with pages specifically designed to secure snelled flies, like the one Mr. Akerman is holding.

Frontpiece from John Yonge Akerman's
"Spring-tide" 1850

Is that a Fly Book or a Fly Box
Under That Elbow?

     The pages of these fly books were natural parchment skin, fashioned into little envelopes or pockets for the flies to slip into. These pockets were created by folding the parchment back on to itself and then creasing the folds into flat, deep loops. The folds were then held in place by stitching along the outer edges of the page, often in blue thread.

       In an attempt to avoid crushing the flies and allow air to circulate, small discs of cork or thick leather were sometimes glued into the outermost corners of the pages as spacers. Besides the pockets, you will see strips of ribbon or parchment mounted through slots in single pages, to secure coiled bits of line or snelled flies.

Original 1820's Fly Book

Image Courtesy Mullock's Auctions

    The earliest surviving example of a fly book I've found was featured at a Mullock's Auction in the UK. They called it a wallet but I'll talk about that later. Attributed to the early English tackle maker Onesimus Utonson, it's literally a small book with marbled board covers and parchment pages. This extremely rare book was protected by a fitted leather slip-cover that was secured with long ribbon ties. A similar example turned up at an Angling Auctions sale (also across the pond) and was inscribed with a date from the 1820's. Very cool ! Unfortunately, none of the auction pictures revealed the design of the pages but from the description it appear that they are envelope style.

Leather Bound Fly Book
Showing Parchment Leaves and Corner Spacers

(note the sweet fly tying clamp)

Image Courtesy Mullock's Auctions


     It appears that in the mid-1800's, manufacturers began to shy away from the stiff covers and create more durable leather-bound versions. Even the early style ribbon ties would eventually give way to a sensible strap and buckle. Sometime during this inevitable evolution, the fly book became known as  the fly wallet in contemporary literature. Today it seems the terms fly book and fly wallet are interchangeable.

Another Early Fly Book
With the Owner's Notations

Gotta keep track of those killing patterns !
Image Source Unknown


     In order for me to craft a rational ( and affordable !) replica of a fly book, I had to get over the notion of using actual parchment skin for the pages (I can only wish). What I ended up using  ( warning for the purists, get ready to cringe ) was the modern material known as Tyvek. Tyvek is a non-woven polyethylene fabric that has many modern applications. After I lightly coated some pieces with thinned orange shellac, it looked and felt similar to real parchment. Luckily I found a ready source for this modern fabric in Tyvek shipping envelopes.

My Replica Fly Book
with Linen Tape Ties

Pictures by author

     Once I decided on a pattern for the cover, I cut out the pieces from scrap leather left over from earlier projects. Black calf on the outside, sandwiched with dark brown for the lining, gave it an nice look. From my experience with bookbinding and what I could gather from photographs of originals, the parchment pages of these little creations were sewn into signatures or groupings,  just like real books.


Note the Cork Spacers
and Stitched Edges of my
Faux Parchment

    I also discovered that on some original fly books, the parchment pages were  interspersed with felt or wool pages. These were probably intended to help dry the wet flies as they were returned to the book. My final design called for five, double-sided pocket pages, six blank pages and two wool pages.

My Tools of the Trade


    Many examples of fly books also include a place for the requisite tools of an angler. For me that would be tiny scissors, tweezers and an awl to open knots. On the other inside cover, I designed a expandable pocket for extra line etc.. As you can see, my book has already provided faithful service and will continue to do so. On to the next project.


Original 1860's Fly Box on the Right
Together with an Early Fly Book

Image Courtesy Angling Auctions


    The second half of this post is on "fly boxes", a form more familiar to today's fly fisherman than those antiquated book things. I was curious  how far back boxes go into the misty past of tackle history. Fly books served the angler well when he was fishing wets, as flattened flies aren't too much of a problem. Is it possible that boxes arrived to keep up with the increased interest in dry fly fishing and the need to keep the flies neat ? I'll leave that one to the experts. The earliest example of a fly box  I've discovered is from the 1860's according to the auction specialists who sold it.

My Fly Box Closed
Nice Ties Eh ?
.

    The idea of creating my own version of this early box seemed very doable thanks to its simple design and a good photo to work from. The original is described as made of leather covered cardboard. For mine, I chose painted cloth over book board as a slightly cheaper version. If you study the picture of the original, it's easy to see how one side of the box hinged into the other. Pretty darn cool !

Interior View

Notice how the cork panel on the right is smaller
to allow the box halves to seat inside each other


     One of the things I loved about this rare survivor, was the cork interior. A simple, classic and effective solution to fixing the hooks. I had trouble finding 1/4" thick natural cork sheets so I opted for modern crushed cork sheeting that still has a good look and function. I think it turned out great and my flies like it too.  I would recommend making this style fly box just for the fun and affordability of it. Fish on !!

                                                            Thanks for looking !
     .

Monday, August 19, 2013

More 19th Century Angling, This Time It's A Reel Adventure


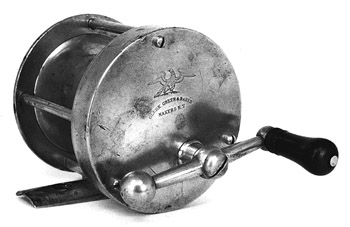
     This post continues my revisit to early 19th century angling with a little more information on reels. In my original post of February 2011, I outlined my quest to recreate typical coarse fishing tackle in use during the 1840's but left out a lot of the fun stuff  I learned along the way. One thing I discovered was that  sophisticated multiplying reels were crafted by watchmakers in Kentucky as early as the 1820's but that style of reel was actually invented in England in the18th century.

A Clerk, Green & Baker Classic New York Style
Ball Handle Reel
                                          Image Steve Vernon www.antiquefishingreels.info

       Even though these reels represent the finest offerings of their time, I realized immediately that they were a little beyond my "shade tree" machinist's ability to recreate. Besides, even if I thought I could pull one off, I don't own the lathe to make it happen. What I was looking for was a simple and typical "winch" of the period that I knew I could copy and use. Multiplying reels were revolutionary and allowed for direct casting of line off the reel whereas simple winches were just for storing line.

     First, a little history is in order. It's believed that the fishing reel originated in China, sometime around 300-400 AD based on depictions in surviving art.

First Fishing Reel
                                     Image courtesy www.realreels.com
                                                                             
        Taking a giant leap forward to England, Thomas Barker mentioned a "wind" and provided a cryptic drawing of some kind of reel in his 1651 publication "Delight or the Art of Angling" and a little later Robert Venable used an illustration of a clampfoot reel in the front piece of his 1662 " The Experienc'd Angler or Angling Improved".

Venable's Front Piece, Clamp-Foot Reel detail
                                   Image courtesy flyfishinghistory.com


      By the late 18th century, it appears by all accounts that the reel was an accepted part of the angler's kit in Europe and in use by at least some gentlemen anglers in America.

    I think it's safe to say that by the 1840's, the reel was considered an angling essential and I would imagine a typical American tackle shop might have offered a range of reels of varying qualities and styles. I assumed from the evidence that early reels were typically crafted of nickel silver or brass until a well crafted wooden version caught my eye.
Fantastic Early Wooden Reel
                                      Image Courtesy Mullock's Auctions       

      This particular wooden clamp-foot reel is quite rare and turned up in an auction in the UK. As cool and early (perhaps too) as it is, I decided to make mine a reproduction of an all metal reel.  I chose brass since it's easy to come by and easy to work with and I already have a brass scrap pile to dig through.

A Classic Mounted Spike-Foot Reel 
                                   Image Courtesy Mullock's Auctions

    Style wise, early 19th century winches can be categorized according to how they attached to the rod. According to some historians, the spike-foot reel may have predated the clamp-foot which predated the plate-foot. Are you with me so far ?

Salter's Plate and Clamp-Foot Reels
                                           Image Source Unknown

      What I know is, at the time of T. F. Salter's "The Angler's Guide" (1823) the clamp-foot and plate-foot co-existed as seen in his illustration. Salter's plate-foot is early enough in style to have a padding attached so as not to mar the rod. These stitched on pads are fairly common on surviving clamp-foot reels.

A Nice Classic Clamp-Foot Winch with a Missing Knob

                                             Image Source Unknown


     I started to warm-up to the clamp-foot variety as it was certainly around in the 1840's and even up to the 1860's by some accounts. Once I gathered enough information, I made a scale drawing of my reproduction and began scrounging up the brass stock. I previously mentioned the absence of a lathe in my shop. A considerable deficit for the well-rounded craftsman of today but for me there's always room for improvising a substitute.

    Years ago I discovered that you can center and spin small, flat pieces of metal on a drill press if you support the arbor from below. My arbors usually consist of a small diameter bolt with nuts and washers to clamp the work. The support from below is held in a vise that I clamp to the drill base. Most of my milling and cutting is done with a well-braced Dremel tool using their cut-off wheels and circular files. Safety goggles are a must as is a steady hand. Laying everything out first with a sharpie is also very helpful.  

Warning, I do not recommend this as a practice but included it here as a document of my work.

     When all the circular pieces of the reel were finished, I cut the pillar rods to length and turned their ends diameters down for eventual peening. The other end of the pillars were drilled and tapped for screws.

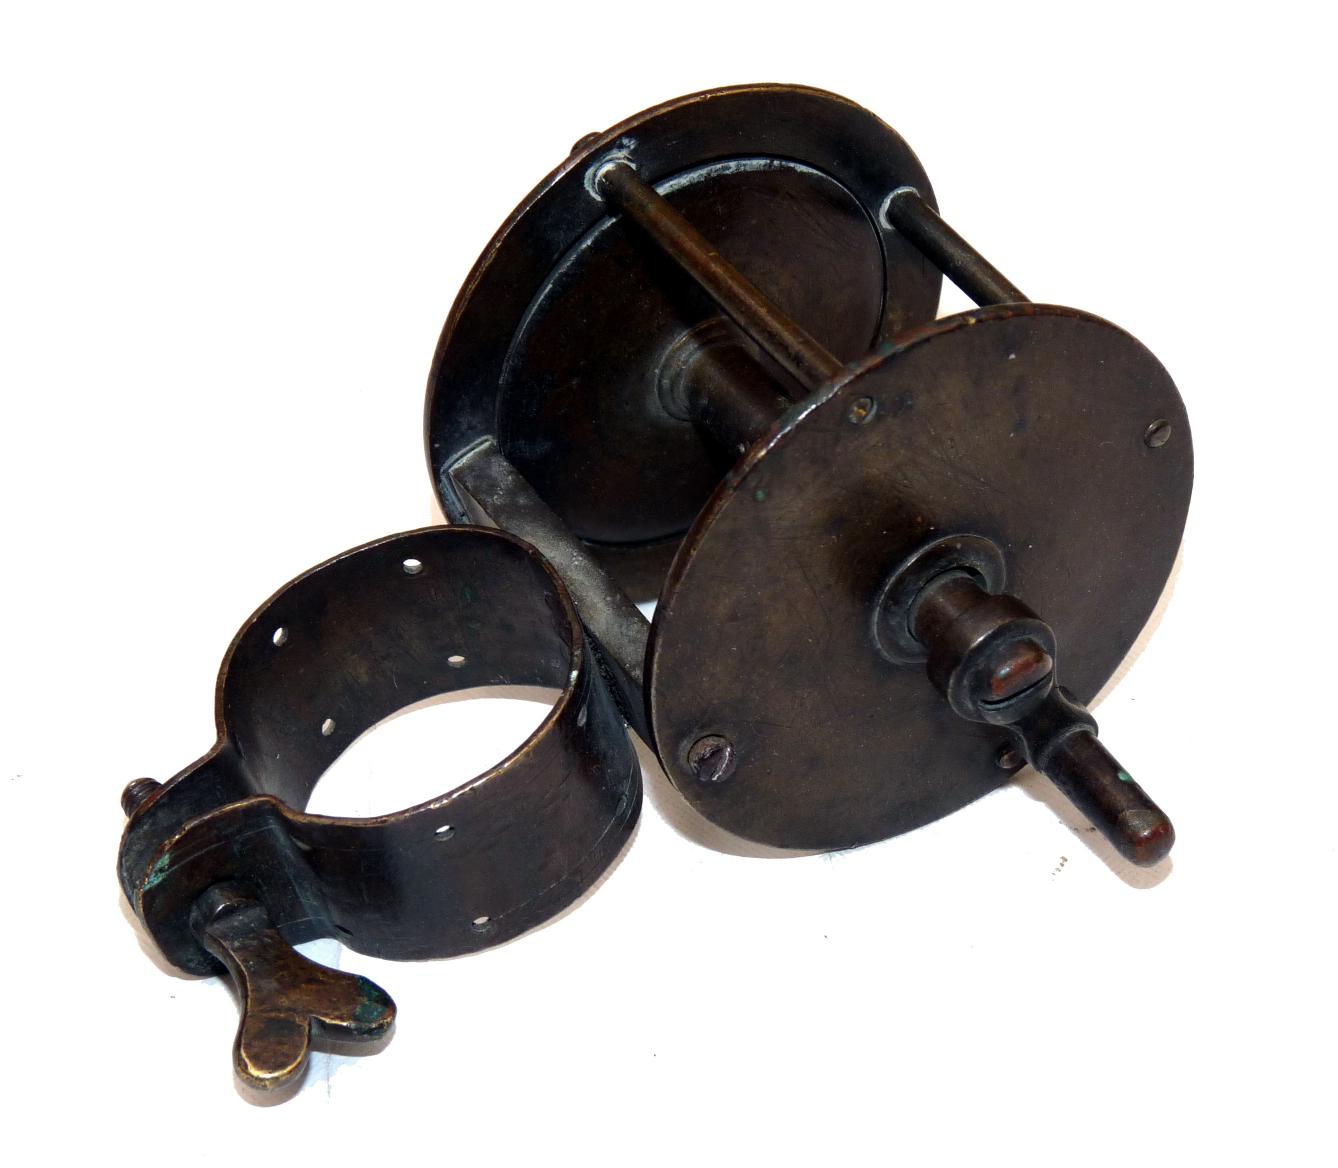
My Finished Clamp-Foot Reel
                            Note the Horn Knob and Leather Lining on Clamp
                                                     Images by Author

     One of the little challenges was to accurately die stamp the cupped ends of the reel's spindle so they could rotate smoothly on center, in their proper recesses.

View of the Opposite Side, Showing Screws


     The clamp foot part of the reel is riveted to a stout bar that helps to maintain the reels integrity as a stable cage for the spindle. One end of this bar was riveted to the outside plate with two pins to prevent twisting. When it came to making the actual clamp, I found it difficult to get a tight bend at the bottom, so I cheated and hard soldered on separate pieces at the proper angle. I really love the way the heart shaped screw turned out. It's a great period detail.


     The final challenge on this project was creating a functional clicker mechanism. Luckily I had made some notes and a drawing of my antique English reel's clicker when I rebuilt it.


The Inner Workings of My Clicker
                                       Please Excuse the Sloppy Solder

          So there you have it, it turned out to be a "real" adventure after all but worth it.
    

Friday, August 2, 2013

19th Century Angling Revisited - A Closer Look at Creels

       Back in January of 2011 when I  posted on my exploration of mid-19th century angling, I barely touched on most of the subjects. In the next few posts I hope to revisit some of those topics with a little more depth. This first return visit is on early creels and as you will see, my research turned up some interesting varieties.

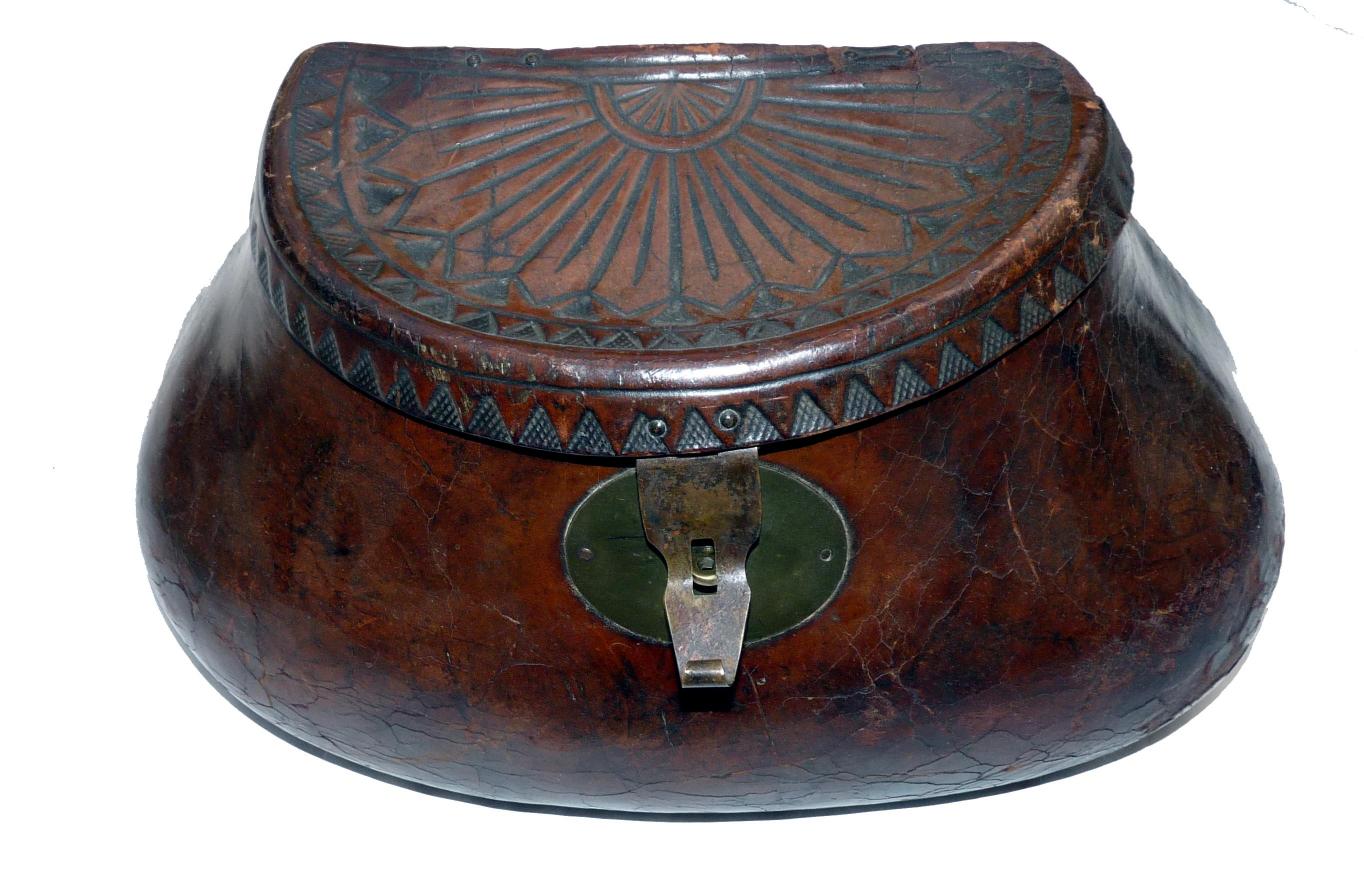
      Before I made my own version of a classic "pot bellied" creel, I wanted to study some of  the material options available at the time. Creels made of leather seem to be some of  the earliest and rare forms to have survived. Experts date some back to the 18th century but as you can see below, they were still being used in the late 1800's as well. Most of these are English in origin but who's to say they didn't make it to the States.

Leather Creel Listed as 18th Century

                              Image Courtesy of mullocksauctions.co.uk

      I found one fine example adorned with the former owner's fishing triumphs, celebrated with brass plaques dating to the 1890's. Maybe the 90's angler was using a family heirloom.
Image Courtesy Kovels.com

     As much as I love to work in leather, the challenge of a large molded form was a little intimidating to say the least. I also had a problem with the idea of putting slimy little fishies into a leather container, so I decided to pass on leather.

     I imagined the possibility of a wooden creel but wasn't sure how that might have worked. The weight issue of a wooden form caused me to think that a lightweight, bentwood design might have developed. Bentwood storage boxes were very popular in the 19th century but I couldn't find an early example of a bentwood creel and I wasn't interested in creating a fantasy piece.
Image Courtesy mullocksauctions.co.uk


     Long after my creel project was completed, a bentwood creel did turn up and proved my hunch. As you can see in the pictures it does possess round storage box characteristics. Perhaps a fun project in the future.

Image Courtesy mullocksauctions.co.uk


    Continuing on, I toyed with the idea of metal for creel material. Tinsmiths could make almost anything imagined so it seem plausible.  My research didn't turn up a datable example, so I continued on with my quest. Never say never as I recently discovered what may be a rare tinplate (or zinc?) creel from the mid to late 19th century. I'm no expert but its potbellied form is undeniably classic and combined with the construction details, screams "early". Hmmm, maybe another future project ?

 
 Sheet Metal Creel, Unknown Age


                                    Image Courtesy collectorsweekly.com


    I finally decided to reproduce a basket creel. Many early 19th century angler's guide books describe creels as baskets and the earliest photographic and print evidence supports their popularity as well. I know that center hole basket creels have been around at least since the 17th century. Robert Venable's book "The Experienc'd Angler", published in 1662, shows one in its front piece illustration seen below.

 Image Source Unknown


               Centuries later the popularity of baskets as creels continued as seen in the print below.

1831 "Implements for Fishing" Print, Note the Creel at Top
                                                             Image source unknown                                            

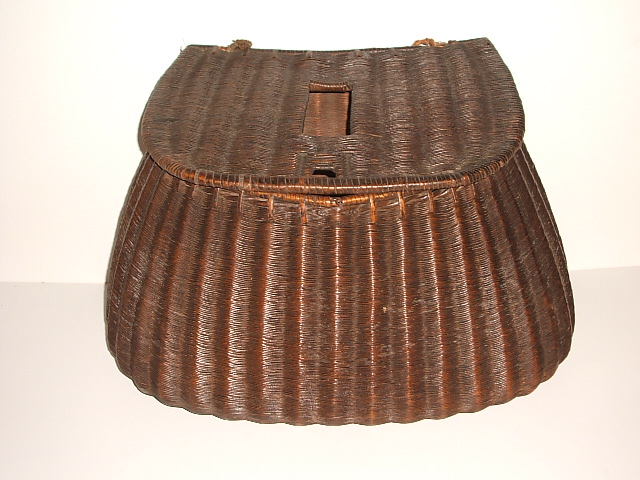
     Some of the most appealing 19th century basket creels were made of finely split willow and according to some accounts, many of the earliest were French in origin. Later imitations of French creels were apparently produced in Japan. Imitation or not, they are beautifully made and way beyond my skill level to reproduce.

A Classic Early Split Willow Creel


                                                                 Image source unknown


Mid-19th Century English Angler's Club
                                                   Note the Variety of Basket Creels

     When I finally turned up a little less refined 19th century willow creel, I felt there was hope for my reproduction project to continue. Apparently, not all creels were works of art. 

Early English Willow Creel
                                               Image Courtesy mullocksauctions.co.uk


     All I was left to do was locate a source for the proper willows and a pattern for a creel. Just that. I lucked out when I discovered Bonnie Gale's English Basketry Willows. Not only did Bonnie sell the exact willows I needed for the project, she also offered a beautiful basic creel pattern seen below.


     I figured the pattern would give me the basic form and I could amend as I built the creel to get closer to the pot-bellied shape. That was the "plan" at least. After the willows arrived in a very l-o-n-g bundle, I did a little experimenting to discover what I had gotten myself into. The willows have to be soaked to be pliable but not too long mind you. Too long and they get all mooshy. They needed to be just right. After their soaking and while they are waiting to be woven, you wrap them in a damp towel to keep them pliable. Good thing we have two bathrooms, as the only place that I could soak the willows, was in my bathtub.

     First I needed to grade the willows by size and make some choices on weave designs. Bonnie's pattern was awesome but in truth, I had no idea what I was doing. That's never stopped me before and so armed with excellent instructions, I plunged ahead. One thing I learned right off was that you need to have strong fingers, about five more than nature provides. You also need room to swing the willows around as you weave. 

     I'm pretty happy with the way my beginner basket / creel turned out but I can almost hear Bonnie saying, "your third one will be even better".


                                  Front view of my finished English Willow "Pot - Bellied" Creel.


                 Back view showing the hanging ring seen on early examples. Note also the curved
                                        shape to hug your hip and the holes for the strap


                                                 Side view showing the narrow profile


                                                Top view showing the detail of the latch pin


                                                 Inside view showing construction details
                                                                 What.......no fish ?
                                                          
                                                                Thanks for looking !


Tuesday, July 16, 2013

More 19th Century Angling or Tackling Obscure Tackle

     I lucked out recently and won a piece of early 19th century tackle known as a Clearing Ring, on an online auction. I recognized it from the illustration in T. F. Salter's 1823 "The Angler's Guide".  It's a simple device designed to unsnag your line when it's caught on some underwater obstacle. Apparently snagged lines have been plaguing anglers since there's been anglers.

Original Illustration from T.F. Salter's "The Angler's Guide"
Note the Clearing Ring on the right
and the Disgorger

     The way it works is pretty straight forward. Once your line has snagged, you pop-up the latch on the top of the ring and open it up. With your rod at an angle, you place the ring over it and close the latch. By dipping the rod down and letting out the ring's tether cord, the ring descends off the rod and over your line. By its weight, it will continue to slide on down to the snag and hopefully, with a couple of tugs on the tether, free the snag.

My Original Clearing Ring
photos by author

     From my research, it appears that most of the original Clearing Rings were made of brass. Salter even called it a brass Clearing Ring. I was determined to make a replica for my own use but having a foundry cast the parts in brass was beyond my budget. Instead, I opted for a bi-metal version that would still function and look the part. Over the years, I've had pretty good luck casting linotype metal in a plaster mold and having the orignal Ring to mold from, made it almost easy. For the latch mechanism though, I decided to go with brass for its toughness.

My Replica Clearing Ring and Thumb Winder

    Along with the Ring, I needed to secure the tether line to some sort of spool. The original Clearing Ring I purchased, used an old float for a winder. As cool as that was I decided to make what Salter called a Thumb Winder. Basically, it's a wooden spool that spins on your thumb. Is that fun or what ? I turned my Winder out of a piece of birch that I had laying around. After it came off the lathe, I carefully drilled the hole through, big enough for my fat thumb. A little stain and some burnishing and it was ready for service. For the tether, I chose a strong hemp cord.

An Original Bone Disgorger
Online source unknown

   Just before I launched into the Clearing Ring project, I carved a bone disgorger ala Salter from an 8" bone folder that I purchased online. So there you go, a couple of fun projects and more period gear in my cluttered creel.
My Bone Disgorger ala Salter

Wednesday, June 12, 2013

Making a Working Model of Eli Whitney's Cotton Gin

    My wife's consuming interest in history rivals mine at times and her latest endeavor is a good case in point. She is currently raising a mini-crop of naturally colored organic cotton to learn about the plant and its product.


Some of Lindy's Cotton, Day 67
Photo by Lindy Miller 2013
     Further along into this project she hopes to become a good cotton spinner as well. Since cotton comes with seeds mixed in the fibers, my part in all this is to build her a working model of Eli Whitney's Cotton Gin .That way, she can process her anticipated cotton bolls with historic flair and eventually do demonstrations as well.


 Patent Drawing for Eli Whitney's
Cotton Gin
Image Courtesy en.wikipedia.org

    Patented in 1794, the Cotton Gin in retrospect has a dark side to its history. Before its invention, cotton seeds had to be laboriously removed from the fiber by hand. In general, this time-consuming process held back any large scale production of cotton until Whitney's revolutionary machine arrived.

    Once mechanical ginning was established, cotton production soared in the South. Some historians today name the Cotton Gin as the root cause of the Civil War. I think that's a bit of a stretch but it did play a part in the expansion of slavery even though it was intended to reduce labor.

    In order to build a working model, I had to understand the basic function of the Gin. The three key elements in Whitney's design are the rotating claw-like hooks (that grab the cotton fiber), the slotted comb that they rotate through (the narrow width of the comb's spacing keeps the seeds from being pulled through by the hooks) and the rotating brushes that remove the seedless (ginned) fiber from the hooks.

               
Original Patent Model
Note the Ginned Seeds in the Lower Front and
the Cleaned Cotton in the Upper Rear
Image Courtesy history.com

    I started by studying the 1794 patent drawing but was disappointed to learn that the accompanying description is unavailable. Two original models of the Gin have survived, one is the patent model and the other a later version used in the court battles against infringement. After studying the few pictures of the models online, I finally figured out the mysterious curved, springy comb that allows the ginned seeds to fall through.


Close-up View of Another Early Model
Note the Hooks, Slotted Comb and Springy Wire Comb
Image Courtesy of newsdesk.si.edu

    My first attempt at making a wooden drum with hooks was a dismal failure. I drove wire nails into a large dowel and cut them to length. After bending them all into directional hooks, it started to look pretty good. What I discovered was, the hooks tended to rotate, which doomed their chances of proper alignment with the all important comb. Whitney had used flat metal hooks but I didn't see myself cutting out a bazillion of those little things.


My Version of the Hook Drum
Photos Courtesy Lindy Miller
2013

     Instead, I created little circular saws in sheet steel similar to what was used in a later patent improvement by Hogden Holmes. In order to build up a cylinder, I sandwiched my little sawblades between discs of 3/8" plywood. Once stacked, I ran two small steel rods through on either side of center and riveted their ends over washers. I squared the center shaft hole by driving a piece of 1/4" square stock through the existing 1/4" round hole. The finished drum turned out to be about 4  3/4" long by 3" in diameter.


View From the Top
Showing Hook Drum in Place, Spring Comb
and One Brush Section
    The rotating drum is the heart of the machine and everything else is built around it. I constructed the housing box of 1" x 6" #2 pine and sized the inside to accomodate the length of the drum. I could only guess at the overall size of the box as this was quickly becoming a design as-you-go project. Next came cutting out the steel comb, which had to be curved to hug the drum but still allow the free motion of the hooks.

    The rotating brush drum was created using a 2" dowel and four sawed out sections of a new scrub brush. Little by little, it was starting to come together. The previously mentioned curved, spring comb thingy had to angle into the rotating hook drum at such a degree to cradle the raw cotton. I made mine removable as that's what the orignal model appears to have.


The Finished Model Cotton Gin
Showing the Completed Brush Drum and Pulleys

   Last but not least was the crank handle (mounted on the hook drum shaft) on one side and the two pulleys on the other.  The ratio of my pulleys is approximately 2.5 to 1. For a belt, I used a rubber band and twisted it in the middle to reverse the direction of the brush drum pulley as per the orignal design.


View From the Other Side
Showing the Crank and Slotted Comb

    Now came the test. Luckily, my wife had some unginned cotton bolls so we didn't have to wait months for her crop to mature. Cranking away,  it made this great primitive machine noise and the best part was.....................the darn thing WORKED and................. my wife is happy. Mission accomplished !

            To see a demonstration of the model, use the link below to go to Youtube:


                                  https://www.youtube.com/watch?v=QPPfFHF7nvg

 If you would like to build this working model, you can purchase a complete plan from us on Ebay. Just search Ebay for Cotton Gin Plan.
                                                      

Wednesday, May 8, 2013

Making a Spectacle "for" Myself, A Revisit to 17th Century America

   Once apon a time I was quite the collector of old stuff. Apparently I had more disposable income back then or antiques were more affordable. Much of my accumilation focused on early to mid 19th century personal items like men's clothing and accessories. One of my favorite accessory catagories was historical eyewear. I still have a nice, small collection of spectacles including the oldest pair I could every find or afford, circa mid-18th century. Spectacles have been around for 700 years but the further back you go, the rarer and pricier they become.
  
   Lately I've been interested in the kinds of spectacles that might have been worn in 1600's Colonial America. With auction prices around $3,000.00 to $4,000.00 for early Nuremberg wire or leather nose-bow spectacles, it's pretty certain they won't find their way into my humble collection. Oh darn !! But then, would I deny myself the fun of replicating a pair ?....... not likely.


A Sweet Pair of Nuremberg Wire Nose Specs
 From a Recent Online Auction
 $3,000.00 + !!

    Every successful project begins with research and luckily I have a few good books on the subject. "A Spectacle of Spectacles", Carl-Zeiss-Stiftung Jena 1988, has some nice representative replica pairs. Pierre Marly's "Spectacles & Spyglasses" 1988, documents many 17th century nose besicles in whalebone, horn and brass wire. "Eyeglass Retrospective", Nancy Schiffer 2000, has a whole page devoted to 17th century leather frames. Most of them appear to be rather crudely made but I have seen more carefully crafted examples, like the one below.


A Nice Original Leather Pair With Green Lenses
Image Source Unknown


       An amazing opportunity for studying leather spectacles, is in the recovered cargo from what is known as the Gnalic shipwreck. Lost in a storm in 1583, near the rocky islet of Gnalic,south of Croatia,  archaeologist began recovering its cargo in 1967. Included in that recovery, were 20 boxes of Nuremberg type leather spectacles in an amazing state of preservation. Each box contained 12 pairs, which greatly increased the number of know surviving examples in the entire world.


Treasure from the Sea
Image Courtesy
 The Institute of Nautical Archaeology


      Today there are some pretty awesome online resources for studying spectacle history. One recent discovery that I've been revisiting is "The Online Museum and Encyclopedia of Vision Aids".


German Masterpiece Spectacles
The Inspiration for My Case
Image Courtesy
The British College of Optometrists
      I finally decided on replicating a pretty typical leather Nose Bow Spectacle that might have originated in Germany (or what would become Germany) in the 17th century but made its way to America. For the leather I chose vegetable tanned cowhide, approx. 4mm thick. First I used a 1 1/4" punch to knock out the circles that would accept the lenses. Luckily, I had some vintage lenses that worked as "readers" for my weak eyes. To cut out the outside shape of the frames, I used a No. 11 xacto and carefully followed my pencil marks. The lens holes were slightly smaller than my lenses and that tension kept them in place. I then dampened the leather and molded it nicely around the lens edge. When you carefully study the Gnalic specs, it appears that they might have been two pieces of leather,sandwiched together but I'm no expert.


My Case Closed
Photo by Author 2013
Note the Stapled Hinge Pins and Hook

     The case I decided on was a simple wooden version with some typical features that I had seen in several original examples. I found that wire loop-pin hinges and a simple wire hook closure suited my needs. For the body, pine seemed like a good choice for carving because it's a common wood that's easy to work.


      I couldn't resist the look of the marbled paper for a lining. This shows my replica leather specs inside their case.


And Outside Their Case


Thanks for looking !