Hello and welcome to my blog. What I'm doing here is documenting my personal expression of "hands-on history" from a craftsman's perspective. I've been on this path for a large part of my life and it's taken me to some interesting and challenging places. I hope to share the processes and the historically inspired objects I've crafted along this journey into our past. This adventure has deepened my appreciation for past craftsmanship and the intelligence of common place things in Early America. Besides, now I have all this cool stuff to play (teach) with.


Jim Miller


Friday, August 2, 2013

19th Century Angling Revisited - A Closer Look at Creels

       Back in January of 2011 when I  posted on my exploration of mid-19th century angling, I barely touched on most of the subjects. In the next few posts I hope to revisit some of those topics with a little more depth. This first return visit is on early creels and as you will see, my research turned up some interesting varieties.

      Before I made my own version of a classic "pot bellied" creel, I wanted to study some of  the material options available at the time. Creels made of leather seem to be some of  the earliest and rare forms to have survived. Experts date some back to the 18th century but as you can see below, they were still being used in the late 1800's as well. Most of these are English in origin but who's to say they didn't make it to the States.
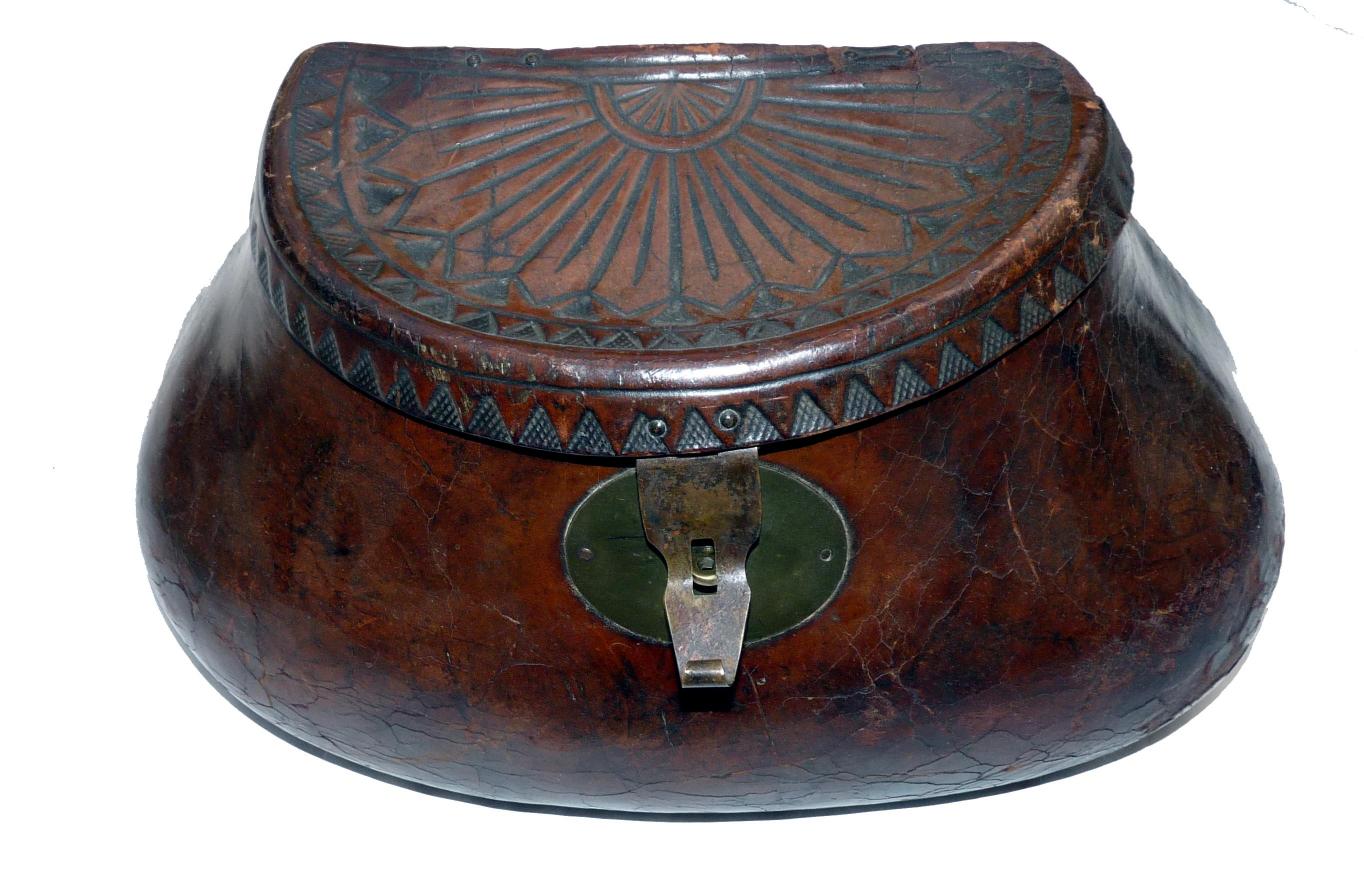
Leather Creel Listed as 18th Century

                              Image Courtesy of mullocksauctions.co.uk

      I found one fine example adorned with the former owner's fishing triumphs, celebrated with brass plaques dating to the 1890's. Maybe the 90's angler was using a family heirloom.
Image Courtesy Kovels.com

     As much as I love to work in leather, the challenge of a large molded form was a little intimidating to say the least. I also had a problem with the idea of putting slimy little fishies into a leather container, so I decided to pass on leather.

     I imagined the possibility of a wooden creel but wasn't sure how that might have worked. The weight issue of a wooden form caused me to think that a lightweight, bentwood design might have developed. Bentwood storage boxes were very popular in the 19th century but I couldn't find an early example of a bentwood creel and I wasn't interested in creating a fantasy piece.
Image Courtesy mullocksauctions.co.uk


     Long after my creel project was completed, a bentwood creel did turn up and proved my hunch. As you can see in the pictures it does possess round storage box characteristics. Perhaps a fun project in the future.

Image Courtesy mullocksauctions.co.uk


    Continuing on, I toyed with the idea of metal for creel material. Tinsmiths could make almost anything imagined so it seem plausible.  My research didn't turn up a datable example, so I continued on with my quest. Never say never as I recently discovered what may be a rare tinplate (or zinc?) creel from the mid to late 19th century. I'm no expert but its potbellied form is undeniably classic and combined with the construction details, screams "early". Hmmm, maybe another future project ?

 
 Sheet Metal Creel, Unknown Age


                                    Image Courtesy collectorsweekly.com


    I finally decided to reproduce a basket creel. Many early 19th century angler's guide books describe creels as baskets and the earliest photographic and print evidence supports their popularity as well. I know that center hole basket creels have been around at least since the 17th century. Robert Venable's book "The Experienc'd Angler", published in 1662, shows one in its front piece illustration seen below.

 Image Source Unknown


               Centuries later the popularity of baskets as creels continued as seen in the print below.

1831 "Implements for Fishing" Print, Note the Creel at Top
                                                             Image source unknown                                            

     Some of the most appealing 19th century basket creels were made of finely split willow and according to some accounts, many of the earliest were French in origin. Later imitations of French creels were apparently produced in Japan. Imitation or not, they are beautifully made and way beyond my skill level to reproduce.
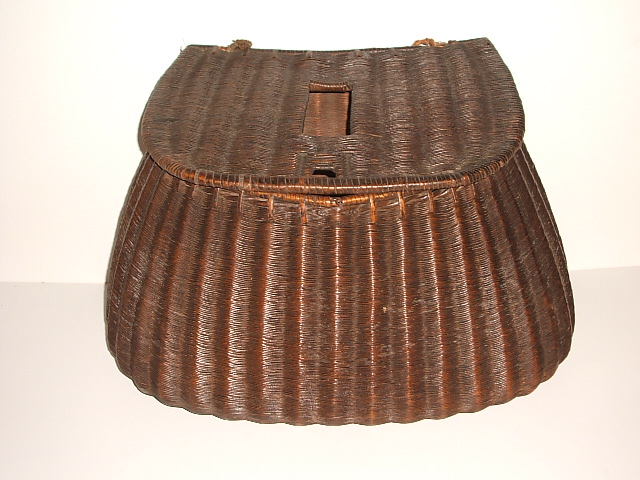
A Classic Early Split Willow Creel


                                                                 Image source unknown


Mid-19th Century English Angler's Club
                                                   Note the Variety of Basket Creels

     When I finally turned up a little less refined 19th century willow creel, I felt there was hope for my reproduction project to continue. Apparently, not all creels were works of art. 

Early English Willow Creel
                                               Image Courtesy mullocksauctions.co.uk


     All I was left to do was locate a source for the proper willows and a pattern for a creel. Just that. I lucked out when I discovered Bonnie Gale's English Basketry Willows. Not only did Bonnie sell the exact willows I needed for the project, she also offered a beautiful basic creel pattern seen below.


     I figured the pattern would give me the basic form and I could amend as I built the creel to get closer to the pot-bellied shape. That was the "plan" at least. After the willows arrived in a very l-o-n-g bundle, I did a little experimenting to discover what I had gotten myself into. The willows have to be soaked to be pliable but not too long mind you. Too long and they get all mooshy. They needed to be just right. After their soaking and while they are waiting to be woven, you wrap them in a damp towel to keep them pliable. Good thing we have two bathrooms, as the only place that I could soak the willows, was in my bathtub.

     First I needed to grade the willows by size and make some choices on weave designs. Bonnie's pattern was awesome but in truth, I had no idea what I was doing. That's never stopped me before and so armed with excellent instructions, I plunged ahead. One thing I learned right off was that you need to have strong fingers, about five more than nature provides. You also need room to swing the willows around as you weave. 

     I'm pretty happy with the way my beginner basket / creel turned out but I can almost hear Bonnie saying, "your third one will be even better".


                                  Front view of my finished English Willow "Pot - Bellied" Creel.


                 Back view showing the hanging ring seen on early examples. Note also the curved
                                        shape to hug your hip and the holes for the strap


                                                 Side view showing the narrow profile


                                                Top view showing the detail of the latch pin


                                                 Inside view showing construction details
                                                                 What.......no fish ?
                                                          
                                                                Thanks for looking !


Tuesday, July 16, 2013

More 19th Century Angling or Tackling Obscure Tackle

     I lucked out recently and won a piece of early 19th century tackle known as a Clearing Ring, on an online auction. I recognized it from the illustration in T. F. Salter's 1823 "The Angler's Guide".  It's a simple device designed to unsnag your line when it's caught on some underwater obstacle. Apparently snagged lines have been plaguing anglers since there's been anglers.

Original Illustration from T.F. Salter's "The Angler's Guide"
Note the Clearing Ring on the right
and the Disgorger

     The way it works is pretty straight forward. Once your line has snagged, you pop-up the latch on the top of the ring and open it up. With your rod at an angle, you place the ring over it and close the latch. By dipping the rod down and letting out the ring's tether cord, the ring descends off the rod and over your line. By its weight, it will continue to slide on down to the snag and hopefully, with a couple of tugs on the tether, free the snag.

My Original Clearing Ring
photos by author

     From my research, it appears that most of the original Clearing Rings were made of brass. Salter even called it a brass Clearing Ring. I was determined to make a replica for my own use but having a foundry cast the parts in brass was beyond my budget. Instead, I opted for a bi-metal version that would still function and look the part. Over the years, I've had pretty good luck casting linotype metal in a plaster mold and having the orignal Ring to mold from, made it almost easy. For the latch mechanism though, I decided to go with brass for its toughness.

My Replica Clearing Ring and Thumb Winder

    Along with the Ring, I needed to secure the tether line to some sort of spool. The original Clearing Ring I purchased, used an old float for a winder. As cool as that was I decided to make what Salter called a Thumb Winder. Basically, it's a wooden spool that spins on your thumb. Is that fun or what ? I turned my Winder out of a piece of birch that I had laying around. After it came off the lathe, I carefully drilled the hole through, big enough for my fat thumb. A little stain and some burnishing and it was ready for service. For the tether, I chose a strong hemp cord.

An Original Bone Disgorger
Online source unknown

   Just before I launched into the Clearing Ring project, I carved a bone disgorger ala Salter from an 8" bone folder that I purchased online. So there you go, a couple of fun projects and more period gear in my cluttered creel.
My Bone Disgorger ala Salter

Wednesday, June 12, 2013

Making a Working Model of Eli Whitney's Cotton Gin

    My wife's consuming interest in history rivals mine at times and her latest endeavor is a good case in point. She is currently raising a mini-crop of naturally colored organic cotton to learn about the plant and its product.


Some of Lindy's Cotton, Day 67
Photo by Lindy Miller 2013
     Further along into this project she hopes to become a good cotton spinner as well. Since cotton comes with seeds mixed in the fibers, my part in all this is to build her a working model of Eli Whitney's Cotton Gin .That way, she can process her anticipated cotton bolls with historic flair and eventually do demonstrations as well.


 Patent Drawing for Eli Whitney's
Cotton Gin
Image Courtesy en.wikipedia.org

    Patented in 1794, the Cotton Gin in retrospect has a dark side to its history. Before its invention, cotton seeds had to be laboriously removed from the fiber by hand. In general, this time-consuming process held back any large scale production of cotton until Whitney's revolutionary machine arrived.

    Once mechanical ginning was established, cotton production soared in the South. Some historians today name the Cotton Gin as the root cause of the Civil War. I think that's a bit of a stretch but it did play a part in the expansion of slavery even though it was intended to reduce labor.

    In order to build a working model, I had to understand the basic function of the Gin. The three key elements in Whitney's design are the rotating claw-like hooks (that grab the cotton fiber), the slotted comb that they rotate through (the narrow width of the comb's spacing keeps the seeds from being pulled through by the hooks) and the rotating brushes that remove the seedless (ginned) fiber from the hooks.

               
Original Patent Model
Note the Ginned Seeds in the Lower Front and
the Cleaned Cotton in the Upper Rear
Image Courtesy history.com

    I started by studying the 1794 patent drawing but was disappointed to learn that the accompanying description is unavailable. Two original models of the Gin have survived, one is the patent model and the other a later version used in the court battles against infringement. After studying the few pictures of the models online, I finally figured out the mysterious curved, springy comb that allows the ginned seeds to fall through.


Close-up View of Another Early Model
Note the Hooks, Slotted Comb and Springy Wire Comb
Image Courtesy of newsdesk.si.edu

    My first attempt at making a wooden drum with hooks was a dismal failure. I drove wire nails into a large dowel and cut them to length. After bending them all into directional hooks, it started to look pretty good. What I discovered was, the hooks tended to rotate, which doomed their chances of proper alignment with the all important comb. Whitney had used flat metal hooks but I didn't see myself cutting out a bazillion of those little things.


My Version of the Hook Drum
Photos Courtesy Lindy Miller
2013

     Instead, I created little circular saws in sheet steel similar to what was used in a later patent improvement by Hogden Holmes. In order to build up a cylinder, I sandwiched my little sawblades between discs of 3/8" plywood. Once stacked, I ran two small steel rods through on either side of center and riveted their ends over washers. I squared the center shaft hole by driving a piece of 1/4" square stock through the existing 1/4" round hole. The finished drum turned out to be about 4  3/4" long by 3" in diameter.


View From the Top
Showing Hook Drum in Place, Spring Comb
and One Brush Section
    The rotating drum is the heart of the machine and everything else is built around it. I constructed the housing box of 1" x 6" #2 pine and sized the inside to accomodate the length of the drum. I could only guess at the overall size of the box as this was quickly becoming a design as-you-go project. Next came cutting out the steel comb, which had to be curved to hug the drum but still allow the free motion of the hooks.

    The rotating brush drum was created using a 2" dowel and four sawed out sections of a new scrub brush. Little by little, it was starting to come together. The previously mentioned curved, spring comb thingy had to angle into the rotating hook drum at such a degree to cradle the raw cotton. I made mine removable as that's what the orignal model appears to have.


The Finished Model Cotton Gin
Showing the Completed Brush Drum and Pulleys

   Last but not least was the crank handle (mounted on the hook drum shaft) on one side and the two pulleys on the other.  The ratio of my pulleys is approximately 2.5 to 1. For a belt, I used a rubber band and twisted it in the middle to reverse the direction of the brush drum pulley as per the orignal design.


View From the Other Side
Showing the Crank and Slotted Comb

    Now came the test. Luckily, my wife had some unginned cotton bolls so we didn't have to wait months for her crop to mature. Cranking away,  it made this great primitive machine noise and the best part was.....................the darn thing WORKED and................. my wife is happy. Mission accomplished !

            To see a demonstration of the model, use the link below to go to Youtube:


                                  https://www.youtube.com/watch?v=QPPfFHF7nvg

 If you would like to build this working model, you can purchase a complete plan from us on Ebay. Just search Ebay for Cotton Gin Plan.
                                                      

Wednesday, May 8, 2013

Making a Spectacle "for" Myself, A Revisit to 17th Century America

   Once apon a time I was quite the collector of old stuff. Apparently I had more disposable income back then or antiques were more affordable. Much of my accumilation focused on early to mid 19th century personal items like men's clothing and accessories. One of my favorite accessory catagories was historical eyewear. I still have a nice, small collection of spectacles including the oldest pair I could every find or afford, circa mid-18th century. Spectacles have been around for 700 years but the further back you go, the rarer and pricier they become.
  
   Lately I've been interested in the kinds of spectacles that might have been worn in 1600's Colonial America. With auction prices around $3,000.00 to $4,000.00 for early Nuremberg wire or leather nose-bow spectacles, it's pretty certain they won't find their way into my humble collection. Oh darn !! But then, would I deny myself the fun of replicating a pair ?....... not likely.


A Sweet Pair of Nuremberg Wire Nose Specs
 From a Recent Online Auction
 $3,000.00 + !!

    Every successful project begins with research and luckily I have a few good books on the subject. "A Spectacle of Spectacles", Carl-Zeiss-Stiftung Jena 1988, has some nice representative replica pairs. Pierre Marly's "Spectacles & Spyglasses" 1988, documents many 17th century nose besicles in whalebone, horn and brass wire. "Eyeglass Retrospective", Nancy Schiffer 2000, has a whole page devoted to 17th century leather frames. Most of them appear to be rather crudely made but I have seen more carefully crafted examples, like the one below.


A Nice Original Leather Pair With Green Lenses
Image Source Unknown


       An amazing opportunity for studying leather spectacles, is in the recovered cargo from what is known as the Gnalic shipwreck. Lost in a storm in 1583, near the rocky islet of Gnalic,south of Croatia,  archaeologist began recovering its cargo in 1967. Included in that recovery, were 20 boxes of Nuremberg type leather spectacles in an amazing state of preservation. Each box contained 12 pairs, which greatly increased the number of know surviving examples in the entire world.


Treasure from the Sea
Image Courtesy
 The Institute of Nautical Archaeology


      Today there are some pretty awesome online resources for studying spectacle history. One recent discovery that I've been revisiting is "The Online Museum and Encyclopedia of Vision Aids".


German Masterpiece Spectacles
The Inspiration for My Case
Image Courtesy
The British College of Optometrists
      I finally decided on replicating a pretty typical leather Nose Bow Spectacle that might have originated in Germany (or what would become Germany) in the 17th century but made its way to America. For the leather I chose vegetable tanned cowhide, approx. 4mm thick. First I used a 1 1/4" punch to knock out the circles that would accept the lenses. Luckily, I had some vintage lenses that worked as "readers" for my weak eyes. To cut out the outside shape of the frames, I used a No. 11 xacto and carefully followed my pencil marks. The lens holes were slightly smaller than my lenses and that tension kept them in place. I then dampened the leather and molded it nicely around the lens edge. When you carefully study the Gnalic specs, it appears that they might have been two pieces of leather,sandwiched together but I'm no expert.


My Case Closed
Photo by Author 2013
Note the Stapled Hinge Pins and Hook

     The case I decided on was a simple wooden version with some typical features that I had seen in several original examples. I found that wire loop-pin hinges and a simple wire hook closure suited my needs. For the body, pine seemed like a good choice for carving because it's a common wood that's easy to work.


      I couldn't resist the look of the marbled paper for a lining. This shows my replica leather specs inside their case.


And Outside Their Case


Thanks for looking !


Sunday, May 5, 2013

Eureka Moments Revisited, Part 7, A Gold Rush Gun Rig for a Colt Navy

     When I recently aquired an Uberti 1851 Colt Navy, it occured to me that the belt and holster that I made for it might make an interesting blog posting. This story starts several years ago, when I was researching the common use of web belts and military style buckles in Gold Rush California.

     Stamped or cast brass tongue and wreath (aka spoon and wreath) buckles are fairly common artifacts found in gold rush camp sites. I have several  friends with large and varied collections, which is strong evidence of their popular use in the period. Dagguereian scholars consider them a key element when trying to identify "Gold Rush" portraits. In fact, it was one of those incredible, documented images that actually inspired this project.


Image Courtesy Cowan's Auction

     What I love about this image is how it captures the spirit of the age. These guys knew they were making history and proudly left us a record of their part in it. I feel that the buckle on his belt is likely a stamped brass version, possibly Taussig - Pollack & Co., San Francisco, similar to the example below.


Image Courtesy of
findmall.com

     The belt in the image appears to be made of webbing and a clue to it's actual weave and color came from an associated artifact that I had previously blogged about. The contemporary "gold porter" below, has what looks like the same webbing to join the two buckskin halves of the vest, as you can see in the picture. The most compelling evidence that it's the same webbing, comes from the historic record that Taussig - Pollack & Co. were selling gold porters in San Francisco. The only flaw in my theory is that the original porter below is unmarked.


Photo by Lindy Miller

     With this evidence, I proceeded to make a facsimile of a classic miner's web belt and buckle. The buckle was the easy part as Hanover Brass has been casting copies of Gold Rush buckles for years. The belt on the other hand, would take some thought. I knew I wasn't going to weave a belt from scratch but instead settled on dyeing modern cotton webbing that had a similar pronounced woven pattern. After the webbing was dyed a dark indigo blue, I picked-out the woven threads along its borders to make room for the two white stripes. I carefully wove white cotton cord back into the webbing to simulate the stripes of the original. All in all, it didn't turn out too bad. To improve the overall appearance of the belt, I applied another length of dyed webbing to the back to hide where my white stitches came through.


My Facsimile Belt and Reproduction Buckle
Photo by Author 2013

     After I made a brass keeper slide, I assembled the belt around the repro buckle. It's not a perfect replica but I consider it a good impression. Before I had started the belt part of the project, I had made what collectors call a "Slim Jim" (no relation) holster for the Colt Navy. Using origninal examples form Richard Rattenbury's classic book "Packing Iron" for the pattern, I made mine in veg tan leather, sewn with linen thread. I like the look of the straight throat on many documented examples (including the one in the daguerreotype above) and left mine unadorned as many of the earlier holsters appear to be. One last detail was to wet mold it to the revolver.


Photo by Author 2013

    So there you have it. Now, if I choose, I can sport my shooting iron in a style not commonly seen today but very much a part of our California history.

Thursday, April 25, 2013

I Never Knew I Could Inspire

Well, this certainly came out of the blue. Andrew of Victorian Tailoring has nominated me for The Very Inspiring Blogger Award. I am shocked. I never knew that I inspired anything except the wrath of the impatient. Thank you Andrew, you are one very inspiring self-taught tailor my friend. Keep it up !

To comply with the awarding process, you must

                                            - Display the award and link back to the nominator
                                            - State 7 things about yourself
                                            - Nominate 15 bloggers to the award
                                            - Notify the winners


                                        1.  I am a California native and love my State's
                                             rich history and natural beauty.

                                        2.  When people ask me if there's anything I can't make
                                              I reply, Yes.......money !
                                        3.   I'm happily married to a tolerant, like-minded woman.
                     
                                        4.   I'm not really expert in anything but I do have a great
                                              library.

                                        5.   I know a little bit about a lot of things.

                                        6.   I'll always be in awe of the accomplishments of our
                                              forebearers.

                                        7.   The older I get the more I realize there's not enough
                                               time.
                                            
                                   My 15 nominees for the Very Inspiring Blogger Award are : 
                                             :

                                  
 Fishing for History  Dr. Todd's entertaining look at out collective fishing heritage.


 Commitment to Costumes   A visit to Sara's work as a Museum Professional but with tips on managing
   a personal collection. Very helpful.


 Robin's Egg Bleu   If you are going to do one thing, then do it well. This lady's replica Izannah Walker
   dolls are amazing. A total dedication to details.


 The Reverend's Big Blog of Leather  Medieval and later leatherwork with more than the usual
    "history nut" take on things. No surprise from the UK !


 Ready to Wear ( 1640's style)  Just what it sounds like. The Vicar doesn't post often but when he does
   it's always interesting. More fun from the UK !


 A Woodrunner's Diary  Keith has a very active 18th Century Living History blog from "down under".
   Excellent research and lots of info.


Bear Flag Museum  Bill's very active blog on all things Bear Flag. Ties to his online Bear Flag
   Museum. The ultimate source for those that need to know.


 Contemporary Makers   A great way to keep up-to-date with the best of historical arms craftsmen.
  Lots of eye candy thanks to Jan.


 Dressing the 1840's   My friend Chandra's pesonal devotion to "getting it right". In love with
   the 1840's (give or take) and it shows.


 Frontier Carpenter  Ron proves that the homegrown, carpenter/blacksmith of the past,is alive  
   and well today. Great work that has inspired me !


 The Village Carpenter Kari is amazing ! When I want to be inspired, I go visit what a truly gifted
   woodworker is capable of.


 Steamboat Arabia: A Historian's Blog   Elizabeth shares her affection for one of the greatest
   treasures in America. The Steamboat Arabia Museum in Kansas City.


 Minstrel Banjo  Where early banjo geeks go to learn and share. All fun, with no fretting !


 Peter Follansbee, joiner's notes 17th Century joinery beautifully executed.


 The Van Buren Boy's Blog  Documents a truly incredible project.


                                            Thanks for looking !

Thursday, March 14, 2013

How They Kept Their Clays Safe, Revisited

   I recently stumbled across an interesting example of an antique tin pipe case, on an online auction. You often see late 19th and early 20th century tin cases in the shape of the clay pipes they protect, but this one was different. Not only did it safely stow the pipe but housed the tobacco as well. There's even enough room in it for a match safe which suggests it might have been a sort of traveling smoker's kit. From the construction details, I would date it early to mid-19th century.


Picture Source Online Auction

   The design is pretty straightforward, so replication was not going to be a problem. Luckily, I had a nice English clay that I purchased from Columbia Booksellers. It was one of the last Pollock pipes that he had. I decided to build my replica around this pipe instead of copying the exact dimensions of the original.


    The original case is 6  1/2" long by 2" wide. It's an elongated box with one closed end and the other with a hinged lid. Under the lid, you find a compartment sized for the pipe's bowl. Inside, at the back of this compartment, is a panel with an attached and extended tube, to protect the pipe's stem. On the top center of the box, there is an opening for access to the tobacco etc. and a hinged lid to cover it. That's pretty much it, a simple yet effective way to keep your fragile clay pipe safe and your tobacco handy.


     In some of the pictures of the original case, you will notice a fire steel and flint. At one point in this object's history, it had been repurposed as a tinder box or..................was the smoker lighting his pipe with flint and steel, hmmm?


    Here you see the beginings of my replica with the shaped and tapered tube and the above mentioned panel. I had to keep in mind that the pipe shouldn't rattle, so my dimensions were determined by the space occupied by the pipe bowl, while it rested in the tube. Do you follow ?


Photos by Author 2013

    Further along now, you see the beginings of the case body. It ended up being 7" long and 2 1/4" wide.  Note the raised ring on the right, that will be the seat for the pending lid. You can also see the tube running along the inside back.


    Now we have the end closed and we are ready to craft a hinged lid. It's starting to look like something.


    The smaller hinged lid is in place and all that remains is the large, hinged lid on top, with its latching device.


     All finished and good for service and ready to claim it's place in my growing collection of replicated odds-n-ends  from our past.