Saturday, February 26, 2011

How I Learned All About the Earliest Patented Ice Cream Makers On a Dare


Close, But No Cigar

       Okay, so it really wasn't a dare, it was more like a challenge. It all started with a request from my friend Susie Webb. Susie is a dedicated historian and fellow volunteer at Columbia State Historic Park. During our annual Living History event known as Columbia Diggins' 1852, Susie portrays the proprietress of the American Hotel. The Hotel is known for its excellent cuisine as well as a place of lodging for weary miners. Several years ago, she asked me what an ice cream freezer would have looked like in 1852. At the time of the Gold Rush, there was a demand for just about everything in California. It's known that ice was brought down from the Sierra Nevada mountains early on and marketed as a product. Since ice is one of the key ingredients necessary to make ice cream in a freezer, it's logical to think that the treat was available in some of the multitude of restaurants that sprang up. It's well documented that emmigrants crossing the plains made ice cream and even commented on it being available in Salt Lake City in 1854.  Susie not only wanted to offer ice cream to her clientele but she also wanted to interpret the making of ice cream, if it could be produced in a period correct Ice Cream Freezer. My challenge was to research and recreate that historic freezer.

The First Patented Ice Cream Freezer
Only the Paddles Moved On This Version
of 1843
    It's easy to assume that the old fashioned "crank variety" freezer that we all know and love, would be appropriate but that would have been too easy. That familiar stlye is actually a later development. As usual, you must peel back the layers of history, through research, until you hopefully find the answer to your quest. What I discovered was that the earliest mechanical ice cream freezer was patented on Sept. 9, 1843 by Nancy M. Johnson. Nancy's device employed several of the features you would expect. An inner vessel held the ingredients, stirred by a set of paddles, connected to a small handle. The inner vessel would be surrounded by ice and salt that filled the second or outside, larger container. Only the paddles moved on her model. From what I can gather, this earliest freezer had some success, as it is mentioned in another patent as, " The best now in use...." but it was this other "improved" freezer patent that got my attention.

Young's Improved Freezer
Two Parts in Motion On This Model
of 1848
     William G.Young patented his "Improvement in Ice-Cream Freezers" on May 30, 1848. What Mr. Young came up with was a way to stir the ingredients of the inner vessel through the action of an up-and-down perforated plunger, while spinning that vessel as it sat inside of the ice and salt filled outer container. The "improvement" was this spinning action facilitated by a weighted handle on the outside top. The rationale was that it would increase the effect of the cold on the cream and accelerate the process of  freezing. This sent me wondering how successful Young's Freezer was as a commercial product. It all came together when I remembered seeing a familiar illustration in our copy of  The American Home Cook Book of 1854. There it was, on page 9, a nice little woodcut of  Young's machine, described as "Patent Ice Cream Freezer". That was all the corroborating evidence I needed to make my choice of what to reproduce.


Cookbook Illustration and Caption of Young's
Freezer in Common Use by 1854
 
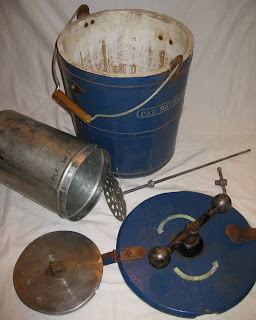
      The cookbook illustration showed me what an actual 1850's freezer probably looked like, at least to the artist who made the woodcut. The patent drawings, as you can see, focused more on the mechanics of the device. After considerable time searching for an actual surviving example of an original Young's Freezer, I finally gave up. Most collections of antique freezers seem to only go back as far as the late 1800's. It does make sense though, when you think how popular ice cream is, that the early ones are probably used up. With only the drawings to go on, I had my work cut-out for me. I already had a nicely coopered bucket that was a fair match to the cookbook picture. I managed to score a vintage inner container from an older White Mountain Freezer that fit nicely into my bucket. I redesigned the lid of the cannister to lock into place. As far as replicating the mechanics I relied on my blacksmith friend George Cantrell to turn up a nicely weighted handle from a large clamp and some other misc. iron that he combined to produce the large spanner on top of the lid. I fabricated what remained including the bucket lid, handle and plunger. Through trial and error, it was discovered that the bucket's lid needed to be locked down in some fashion in order for the freezer to function as originally designed. Even though my version of this freezer is not a replica of an actual original freezer, I did try to limit the conjectural elements in order to honestly represent the original device.

My Recreation of Young's Freezer
Photos Lindy Miller 2011

Exploded View, Showing Inner Container
and Plunger

     After 5 years of service at Living History events, my recreated historic freezer is still going strong and successfully creating delicious ice cream or so I've been told since I'm usually too late for the samples. The lesson for interpreters here is that through the use of carefully researched recreations, the curious visitor may be drawn in by something  familiar (ice cream) and end up gaining insight into history through a rare and unique experience. Was that fun or what?
Susie Webb and a Young Helper
Columbia Diggins' 1852
Photo Courtesy CA State Parks

Sunday, February 20, 2011

Historic Costume Recreations Part 3, My Mid-19th Century Frock Coat and the Protracted Process to Create It.

Mid 19th Century Image of  Average Men
Un-named Source
      This post will focus on my journey to eventually recreate an accurate copy of a typical Frock Coat. These once commonplace, universal garments, were worn by farmers and statesmen alike but are virtually unobtainable to today's historian / reenactor with the exception of the few that are being made by competent tailors. Just to be clear on what I'm talking about, it's not the ill-fitting, shapeless impostor that we see so often today, but the carefully constructed and often fitted Frock Coat of the Mid-19th Century. The key to understanding what a Frock Coat is all about can only come from studying original examples. I know this places limitations on the curious student but many institutions have original Frock's in their collections and the extra effort to track one down is well worth it.

     Let me start this with what it took for me to gain the confidence to pull off a fairly decent coat. Right off the bat, I knew I needed an authentic pattern and I immediately discovered that none had been developed. There is a very good reason why no one has marketed a successful pattern for a Frock Coat yet, it's just too darn hard. Besides being nearly impossible to size it to all the different shaped men out there, it would have to come with a book on period tailoring techniques, written by someone who had the patience to teach us amateurs.

19th-Century Men
or Modern Impersonators ?
      It all started for me around 1991-'92 when I heard from Saundra Altman, of Past Pattens, that a lady named Nancy Torgerson, had successfully drafted a pattern from a documented 1852 Frock Coat and made a replica example as well. Nancy was a tailor from Illinois with some renown in the history world, so I thought it was worth a shot. After considerable correspondence and a chunk of change, she parted with a copy of the pattern. The only unfortunate thing was that she hadn't drafted the pattern in the original size but instead had enlarged it for her client. A little problem but not insurmountable. At least I had something genuine to start with and with the purchase of some wool, I forged ahead. With a crash course on tailoring from a dated Simplicity sewing book I jumped ahead and created my first coat. It was mostly machine sewn and lined with polished cotton in a lovely shade of dark blue to match the blue wool. Okay, so it wasn't a winning replica of the original and it didn't fit all that well but it was a starting point and I learned a lot. Mostly what I learned was that I had a long way to go.

Gathered data and samples
     The next step along the way was the opportunity to study an original late 1850's Frock in the California State collections in Sacramento. I had recently become a volunteer at Columbia SHP and my membership allowed me access. Man did I learn from that coat. I sketched and photographed every detail. One thing that stood out was the fineness of the wool broadcloth and the amazing details in every part of the coat's construction. Was I in for it, the work would be consuming but my confidence was building. I started to formulate a philosophy about all of this "drive for authenticity"and promised myself that I would not cut corners but take the time to gather info, experience and the proper materials before my next attempt.

     What followed over the next few years was a succession of events and serendipitous opportunities that would eventually lead to a successful coat. First, I found some wonderful black wool broadcloth from the Pendleton Mills in Oregon. It had the finish, hand and density that came very close to the original. It didn't unravel when cut and that was a big plus. Next came Saundra Altman's workshops at Columbia in 1994 and later. One of my projects at the workshops was making a winter paletot under the watchful eye of Roxy Barber. Roxy had come to the classes as a guest of Saundra because she was a professional tailor. From Roxy, I learned about how garments were built from the inside out. She was a great teacher of pad stitching and the use of Interfacing, Underlining and Interlining to gain the correct form in the finished garment.

Muslin fitting from 1849 Tailor's Sheet
     Next in this process of gathering, was the unexpected gift of an original  pattern draft of a Frock Coat from a rare 1849 tailor's sheet. The best part was that the muslin tester I made from that draft actually fit me. If that wasn't enough luck, some time after, I had the opportunity to trade for an original mid-century Frock Coat  and a little later purchased another similar example at an antique shop in Amador City. One of the coats qualified as a study piece with opened seams and several large moth holes that I saw as "windows of opportunity". So now I had an authentic pattern, a nice piece of wool broadcloth and original coats to study. Continuing my quest for proper materials, I found a nice wool / cotton jean for the Underlining, from Family Heirloom Weavers and dyed it madder red, as the originals. The proper weight of tow from the same source made for a nice Interfacing and a high quality wool batting from Hobb's Heirloom would serve as my Interlining. The batting was nice and thin so I could layer it for shaping where needed. Even though most coats of the era were lined in mixed-weave fabrics that would show their silk facings, I opted for black silk taffeta from Thai Silks. Brown polished cotton from County Cloth worked out perfect for pocket linings. From Mill End Fabrics in Reno Nevada, I scored a beautiful cotton sateen for sleeve lining.

One of our original 1850's Frock Coats
     I hope that those that read my posts will refrain from judging me as some kind of elitist but part of my personal dabbling into the past is to enjoy it on my terms with no apologies. I choose to hand sew my garments because I enjoy it. It doesn't make them any better than the next guy's effort, just makes them more fun for me. With that said, I used Kinkame Silk #50 for construction and #30 for my buttonholes, from Britex in San Francisco. Linen thread worked best for the inner construction and sleeve linings. By now it's 2003 and I can finally start my coat project.

      Just a couple of little details need mentioning. With the quality of the wool that I was using, I had the opportunity to take advantage of some period details that I learned from studying the original coats. When it came to constructing the finished edges of Frocks, the tailors would turn under the seam allowances on the top only and cut the under piece to the edge. The raw edge of the under piece would be carefully edge stitched down. What you gained from this was only 3 layers of fabric instead of 4 and would give you a thinner edge, that was desirable. The other point I thought worth mentioning was that the hem on the skirt was left raw as well. To give the hem some body, they rolled up the lining to form a corded edge effect, on the inside of the skirt hem. All in all, I was very pleased how it turned out. I'm the last person to claim any expert status when it comes to recreating period dress but from my experience, here is my formula for success in trying to duplicate a Frock Coat. All I can say is Good Luck and keep trying , it's a tough nut to crack.

  1. Find the best possible materials
  2. Use an authentic pattern, drafted from an original source
  3. Learn and practice basic tailoring techniques
  4. Study original coats
  5. Make a fitted muslin and correct to fit, this will be your final  
       pattern


  6. Make the commitment to not cut corners.


 My Replica Frock Coat
Photos Lindy Miller 2011


Rear View


Front View Closed


Side View
For those that read to the bottom of my posts, the collodion image of the impersonators
is the work of my friend Will Dunniway 

Sunday, February 13, 2011

Favorite Historic Costume Recreations Part 2, How to Recreate a Mid-19th Century Marseilles Vest, Using a Portugese Shower Curtain

     Recreating Period Dress can be a challenge on many levels but one of the biggest obstacles to attaining historical accuracy is that many "period" styles of textiles no longer exist. Or do they ? Sometimes, if you apply a little creativity and are open to serendipity, you might just pull it off. This post is about that successful combination and I hope the viewer enjoys the tale.

Our original  mid-century Marseilles vest with later alterationto front
    In the mid-19th century world of the fashionable man, a beautiful vest was an important part of being well dressed. Styles of vesting fabrics changed with the seasons and with the latest trends in fashion. One popular style of Summer vesting was a fabric known as Marseilles. Marseilles Vests were popular for decades and there's a good reason. They were beautiful. In "Scissors and Yardstick; or, All About Dry Goods", published in 1872, Marseilles is described as, "A firm heavy cotton fabric, woven with alternate raised and depressed figures. These figures are usually stripes, diamonds, etc., and are formed somewhat similarly to those of the Marseilles quilts. Marseilles is also printed in colored stripes and figures." I should add that "Figured Marseilles" ( those with a colored design on top of the woven pattern) were as varied as the imagination of the mills and the colored figures were often woven into the fabric to appear as embroidery. This was a big clue to me later when it came to trying to recreate something similar.

       A few years back, I was chatting with my friend Ian McWherter, who is a fellow devotee of Historical Fashion and a fine period tailor. We were wondering about the possibility of a modern substitute for the original Marseilles. Ian went so far as to purchase samples of various cotton goods and sent them to me to aid in the discussion. I seem to remember that they were Dimity or Diaper or something similar but not quite a match for us picky types. One of my problems was that I actually own an original Marseilles Vest and have studied several others, so I was holding out for something closer. That serendipitous moment of discovery happened quite unexpectedly with the arrival of a modern home furnishings catalog, in the mail.


     Restoration Hardware is a higher end home furnishing company that puts out a beautiful catalog full of cool stuff you wish you could afford. The last place you would ever expect to find historic fabric but there it was, just what I had been hoping for in the guise of a Matelasse 100% Cotton Shower Curtain from Portugal. It even came in colors but white is what I wanted and white they had. Matelasse is very similar to the old Marseilles in that it has the bold quilted effect in the way it is woven. This particular Matelasse was woven in a small simple diamond pattern and I was in love. After searching around for a source of the fabric itself, it became apparent that it was not available to the public.

My recreation  with Mother of Pearl buttons
     Not wanting to miss the opportunity, I decided to go ahead and buy the pricey shower curtain and start my plan to turn it into a figured fabric, replicating the original fancy Marseilles. A great source for mid-century designs is Clarence Hornung's "Handbook of Early Advertising Art". In the Pictorial Volume, on page 81, there was a sweet little design that could have been a symbol for "knowledge" or something like that. A scroll wrapped in roses could have meant anything but it spoke to me as the perfect choice to decorate my fabric "canvas" with figures. On my newly purchased Matelasse, shower curtain, I laid out the pattern for the vest using the mid-19th century, double-breasted vest pattern from Saundra Altman's 1990's workshop.Within the vest pattern pieces I marked out the individual positions of the future figures with a washout pen, keeping in mind the overall pattern as if they had been woven on the loom. The next step was the actual embroidery and luckily I found a local custom embroidery shop that would work with me. Stitches in Motion in Sonora, did an awesome job with a three color embroidery, perfectly placing each design where I had earlier marked. It really looks like the figures were woven in at the time the fabric was loomed.

Close up of my recreation, showing Matelasse weave and embroidery
     When the embroidery was completed, I cut out the pattern pieces and sewed them together by hand, following all the details of an original vest, including neat top stitching where needed. In the time period of common use, these Summer vests would have been laundered and lightly starched before being worn so the buttons would have been removable as well as the chest padding. The buttons need a shank on the back and are held in place, on the inside of the vest, by a tiny brass ring. The chest padding would have given the wearer a more rounded form, that was so fashionable at the time. The padding slides between the lining and the fashion fabric on the frontpiece and neatly hangs on a button. All these historical nuances are detailed in Past Pattern's "Single-Breasted Shawl Collar Waistcoat" pattern 018, available to everyone. To me, when recreating historical dress, half the fun is working those details into the replica to celebrate the creativity and intent of the original garment. You really shouldn't skimp on the small stuff. Now, on to the next project!

Sunday, February 6, 2011

A Few of My Favorite Historic Costume Recreations, Part 1, Over-the-Top Suspenders

     I've had a long running association with Historic Costume throughout the creative part of my life. Studying it, making it, wearing it, teaching about it and always loving it. Way back in the Dark Ages, I use to compete in the costume contests at the annual Great Western Gun Show in Southern California. If any of you readers out there aren't old enough to remember or never heard of it, let me tell you, it was the biggest show of its kind then and nothing like it has happened since. The contests were crazy fun and it was a great chance to strut your stuff in front of a judging panel. I even won a few trophys but the whole thing was mostly for entertainment and history was only the theme.

Saundra Altman Teaching a Workshop at Columbia 1994


     Fast forward to the early 1990's and after living  in Northern California for about 6 years I found myself volunteering at Columbia State Historic Park. When the Park staff  found out I had some experience in men's costuming and could sew, I was drafted into the Costume Committee. With the Park being an actual Gold Rush site, the costume focus was primarily mid-19th Century California. That was fortunate, as it was already an  interest of mine. I didn't really "need" an excuse to create more clothes but hey, now I had a good one. Over the years at Columbia, the committee sponsored many costume workshops to improve the quality and authenticity of the volunteer's costumes.  Oh, did I mention, I met my wife Lindy on the costume committee ?  It's important, as she is the better half of the "we". The most successful of the workshops were the ones with Saundra Altman of Past Patterns. Supported by our  encouragement Saundra eventually introduced a line of Men's 19th-Century Patterns to the public. Many of them were tested by Columbia volunteers before they were released. In fact, I owe the successful creation of my Frock Coat to Ms.Altman's generosity but that will come out in a later post.


1853 Suspender Design for Ladies to Make
courtesy
Victoriana Magazine
      Enough of this background stuff, on with the project. In this series of posts, I didn't want to go into "all " of the different costumes or costume elements I've created over the years but I thought it might be fun to tell the tale of  3 of my favorites. The first post (this one) is on a pair of Needlework Suspenders, followed by one on my Marseille Vest Project and the final installment will be the saga of the illusive Frock Coat. Mid 19th-Century needlework suspenders were most likely created by ladies for a loved one, as some evidence suggests. One pair I studied was even inscribed with an appropriate sentiment. Many fashion magazines of the time routinely carried patterns for embroidered suspenders like the ones pictured here.

    I call my replica suspenders "Over the Top" because they turned into one heck of a project. The originals that they are based on were a lucky purchase we made in an antique shop in Petaluma. The moment I saw them I said to myself, "self, you need to copy these". What was I thinking?  I'd never done needlework in my life. Not to fret, my soon to be wife Lindy, was an award winning cross-stitcher and a great and patient teacher.

My Replica on the Left Next to the Original Pair
     First things first, I had to round up my materials based on the original suspenders. To copy the leather findings I needed some 4 oz. vegetable tanned cowhide and Tandy Leather came to the rescue. The white kid leather needed for the backing was a little bit of a challenge but a doll restoration supply company (no longer in business) had some and would sell smaller quantities. The edge treatment on the originals is a wool or mohair cord and Wooded Hamlet Designs had a perfect match except color. The needlework supplies came from JCA, Inc. of Townsend, MA.. The perfect choice for yarn was Paternayan Persian Wool as it matched the original in weight and came in a multitude of colors. There were some accent areas in the original design that were done in Silk Floss which I scored from my wife's old stash. Age had taken its toll on the original needlework as it was quite dark and soiled. I had to imagine what it might have looked like when it was bright and new before I ordered my colors. For the canvas, I lucked out in that a few moth holes in the original suspenders revealed what looked to me like Penelope Brown  11 / 22. It was obvious from the start that I would have to fabricate the buckles to match the originals as nothing like them was available.


My pattern graphs and card for the yarns
     The first thing I did was grid out the beautiful floral pattern in color pencil, on graph paper, so I could understand the design. I had matched the original suspender's yarn colors to a Paternayan color chart and now identified each color's corresponding number on the side of my drawing. There were many subtly different reds and greens, so I needed to simplify the process of recognition. With my wife's endorsement, I made a second graph and this time I used coded symbols to represent the colors. Coming up with 22 different but easily recognizable symbols was fun, sorta. The symbols and color numbers ran down the side of this drawing as well. To avoid confusion, I glued little snippets of the individual yarn next to its number. At this point you might think it was overkill on the planning but I knew what lay ahead and I couldn't afford any mistakes. What followed was the pure joy of creation and my discovery of an age old craft. There is a relaxing rythmic pace to needlework as you see the patterns emurge and it's downright fun. Pulling the yarn just so to keep everything even is a big plus if you want to be consistent. There is no substitue for practice. Now, where have I heard that before ??!!


Once the needlework was finished, I made the brass buckles and assembled the leather components that I had finished before I started the cross-stitch strips. All the sewing was done with linen thread, by hand, and the leather parts were joined with a saddle stitch. At this point I will let the pictures do the talking but in closing I will say it was a great project and well worth it.
Rear View, my replicas on the left
Buckle closeup, original on right

Wednesday, February 2, 2011

19th Century Angling Revisited or Part 2 of Fishing for History

     In the previous post I documented my angling adventure with its focus on recreating a fly-fishing kit from the 1860's. It occured to me at some point during that project that I had completely neglected Historic Coarse Fishing and its place in our country's angling past. So what follows in a briefer account, is how I later recreated a circa 1830's coarse fishing outfit.

    This time around I made the commitment to craft "everything" from scratch, just for the challenge and experience of it. I was inspired in part by Darrel Martin's book "The Fly-Fisher's Craft". I know the book's emphasis is on the history of fly fishing but I found considerable helpful information useful in the creation of my coarse rig. Mr. Martin's book is an inspiration on many levels as it beautifully charts his hands-on journey back in time to uncover the misty beginings of fly fishing. Among many offerings, it explains how the author recreated historic horsehair lines. Now this is cool. A tapered line from braided or twisted horsehair sound like just the challenge to start my project with and it's totally appropriate to the period I'm working in. The final results of my efforts was a 15 1/2 yrd. braided hair line, tapering from 16 hairs at one end to 6 hairs at the other. Maritn's book is very clear on how the splicing is done as the average horsehair is only 20+ inches long. Don't ask me how long it took to braid it, it doesn't matter.

Reels and Rod
T.F.Salter's "The Angler's Guide"
1823
     Next came the rod but I needed to explore my options within the period I was working. There were many. What I came up with was another 12 footer with similar materials to my fly rod but with an earlier influence in construction. I settled on a three piece model, shaped (as collectors refer to them) like a billard cue stick with a continual taper. The butt section was to be ash, the middle would be hickory, and like before, the tip would be hickory, but spliced to lancewood as the final foot of length. Lancewood is a classic choice for a tip but it's a little hard to find. I lucked out by reshaping a vintage drum stick that was made out of it. Instead of ferrules, I opted for tapered splices at the joining ends of each section. These tapered ends would be bound with leather or string when the rod was assembled. Thaddeus Norris had discussed tapered splices as giving a rod more flexibility than with metal ferrules. So with ring guides wrapped in place, a brass buttcap fabricated and installed and a couple of coats of varnish, it was ready to go.

Original Clamp Foot Reel
Courtesy
Mullock's Auctions UK
     What followed was deciding on which style of reel to replicate. When I rebuilt my little original English winch, I was encouraged to discovered the straightforward simplicity of the mechanism. Based on the illustrations in T.F.Salter's 1823 "The Angler's Guide and photos of several surviving examples, I finally settled on a Clamp Foot Winch. From what I could gather, historically the Clamp Foot landed somewhere between the Spike Foot and Plate Foot reel and was in use from the late 18th century through a large part of the 19th. I carefully crafted all the parts in heavy brass plate and rod using my drill press as I don't own a metal lathe. I think it turned out swell. I was careful to make sure it would dismantle for future service, using screws on one side of the pillars, instead of peening them over on both sides, like cheaper reels were made. Lastly, I gave it a horn knob.

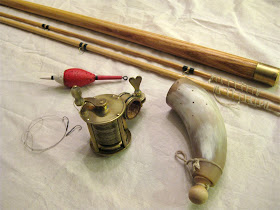
My replicas
Note the spliced ends of the rod sections are covered
with a tapered piece to protect them.
     To round out the project, I decided I needed a Bait Horn (literally a cowhorn to keep bait in) and finally created what I thought was a viable copy. Then my friend Derek Manov looked at it. Always the astute historian and material culture guru he noticed a flaw in my replica. I had mistaken the patterned dots on an original as just that, dots.  Derek pointed out that they were actually tiny vent holes to allow the captive bugs to breath. Thanks Derek, the bugs thank you too. Lastly I need a float and found the perfect choice in another Salter illustration. It's a pretty simple design that's been aroung a long time, cork and a stick, nothing fancy but the paint. I have yet to give any of this tackle a serious workout so the real fun is yet to come.